Thursday, January 19, 2012

Eclipse for Android C/C++ Development


Programming in C/C++ on Android is just awesome! This tutorial shows how to setup Eclipse for using C/C++ together with Java in Android projects.
0) Prerequisities
You need to have Google ADT (Android Development Tools) installed. See http://developer.android.com/sdk/eclipse-adt.html how to do it.
You also need Android ndk. Download it from http://developer.android.com/sdk/ndk/index.html and unpack it somewhere.
1) Install CDT (C/C++ Development Tools) into Eclipse.
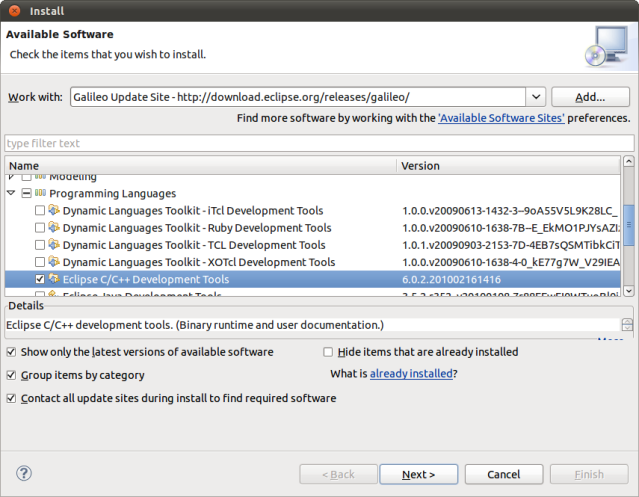
Choose Help->Install New Software… from the main menu.
Choose http://download.eclipse.org/releases/galileo as the source site. If you have another Eclipse release than Galileo choose the appropriate url.
Click Next, Accept licences and finish the installation process.
2) In Eclipse create Android project to which you want to add C/C++ code (if you already don’t have one).
For this tutorial I’ve created simple MyAndroidProject.
3) In file manager create jni/ directory in your project directory and place your C/C++ sources file here. Also put here Android.mk file which is a makefile that tells Android build-system how to build your files.
Take a look into Android ndk docs/ANDROID-MK.html file how to create one.
Simple example of Android.mk file:

LOCAL_PATH := $(call my-dir)

include $(CLEAR_VARS)

LOCAL_LDLIBS    := -llog

LOCAL_MODULE    := native

LOCAL_SRC_FILES := native.c

include $(BUILD_SHARED_LIBRARY)
4)  Refresh (F5) directories in Package Explorer to see jni directory here. Open your .c/.cpp file.
Your .c/.cpp file (native.c in my case) contains a lot of syntax errors which are not truly syntax errors. This is because Eclipse threats the project as a pure Java project. We have to convert the project into mixed Java & C/C++ project.
5) Press Ctrl+n (or choose File->New->Other… from main menu) and selectConvert to a C/C++ Project.
This will convert your project into a mixed Java & C/C++ project rather than into pure C/C++ project (the name of the function is misleading).
Click Next. Then choose your project and below choose Makefile project and – Other Toolchain –. Click Finish.
After doing this Eclipse will ask you if you want to switch to C/C++ perspective. ChooseYes because otherwise you wouldn’t be able to set C/C++ build preferences.
6) Click on your project with right button and select Properties or press Alt+Enter
Properties windows will appear. Here you have to configure use of ndk-build instead of make all command and set proper include paths.
7) Choose C/C++ Build and configure ndk-build as a build command
In Builder settings fill ndk-build into Build command entry. You have to uncheck Use default build command. You also need to have ndk-build script in your PATH.
In Behaviour setting uncheck clean (ndk-build cleans project automatically on build and does not support separate clean command) and clear all text from build (ndk-build does not accept all as a parameter.
Click Apply to save settings.
8) Choose C/C++ General->Paths and Symbols and configure include path
In Includes tab choose GNU C or GNU C++ and click Add… button. Add path to include directory which is located in platforms/android-4/arch/arm/usr/include subdirectory of place where you’ve unpacked Android ndk. Include path depends on target for which you are compiling (android-4 in my case — i.e. Android 1.6).
Finally click Apply and OK and that is all. Now you can use all Eclipse power for editing your C/C++ sources. If you click Run or Debug Eclipse will compile C/C++ code as well as Java code and run it on device/emulator. However you will not be able to debug C/C++ code.
Wednesday, January 4, 2012

Select and Crop Image on Android


Sometimes when creating an Android app that includes user profile picture or avatar, we need to include a feature that enables users to select and crop image to update their profile picture. OnAndroid we can accomplish that by using intent to open image cropper app. To select an image from files, we can pass an intent to image gallery or file manager app then pass the selected image path to camera app to crop the image. It is also the same if we want to take a picture from camera, by passing an intent to camera app to open the camera, take a picture than save it to specified Uri then crop it.
I’ve created a sample project to show how to select and crop image from files or from camera. The source files can be downloaded from my github repository (see the bottom if this post).
MainActivity.java
?
1
2
3
4
5
6
7
8
9
10
11
12
13
14
15
16
17
18
19
20
21
22
23
24
25
26
27
28
29
30
31
32
33
34
35
36
37
38
39
40
41
42
43
44
final String [] items        = new String [] {"Take from camera", "Select from Gallery"};
 ArrayAdapter<String> adapter = new ArrayAdapter<String> (this, android.R.layout.select_dialog_item,items);
 AlertDialog.Builder builder  = new AlertDialog.Builder(this);

 builder.setTitle("Select Image");
 builder.setAdapter( adapter, new DialogInterface.OnClickListener() {
    public void onClick( DialogInterface dialog, int item ) { //pick from camer
    if (item == 0) {
        Intent intent = new Intent(MediaStore.ACTION_IMAGE_CAPTURE);

        mImageCaptureUri = Uri.fromFile(new File(Environment.getExternalStorageDirectory(),
                 "tmp_avatar_" + String.valueOf(System.currentTimeMillis()) + ".jpg"));

        intent.putExtra(android.provider.MediaStore.EXTRA_OUTPUT, mImageCaptureUri);

        try {
        intent.putExtra("return-data", true);

        startActivityForResult(intent, PICK_FROM_CAMERA);
        } catch (ActivityNotFoundException e) {
        e.printStackTrace();
        }
       } else { //pick from file
       Intent intent = new Intent();

       intent.setType("image/*");
       intent.setAction(Intent.ACTION_GET_CONTENT);

       startActivityForResult(Intent.createChooser(intent, "Complete action using"), PICK_FROM_FILE);
       }
    }
 } );

final AlertDialog dialog = builder.create();

Button button   = (Button) findViewById(R.id.btn_crop);
mImageView  = (ImageView) findViewById(R.id.iv_photo);

button.setOnClickListener(new View.OnClickListener() {
   @Override
   public void onClick(View v) {
    dialog.show();
   }
});
Line 1: In this example, i use a selector dialog to display two image source options, from camera ‘Take from camera’ and from existing files ‘Select from gallery’


Line 9: To take a photo from camera, pass intent action ‘MediaStore.ACTION_IMAGE_CAPTURE‘ to open the camera app.
Line 11: Also specify the Uri to save the image on specified path and file name. Note that this Uri variable also used by gallery app to hold the selected image path.
Line 24-29: To select an image from existing files, use Intent.createChooser to open image chooser. Android will automatically display a list of supported applications, such as image gallery or file manager.
?
1
2
3
4
5
6
7
8
9
10
11
12
13
14
@Override
protected void onActivityResult(int requestCode, int resultCode, Intent data) {
   if (resultCode != RESULT_OK) return;
       switch (requestCode) {
          case PICK_FROM_CAMERA:
         doCrop();
             break;

          case PICK_FROM_FILE:
         mImageCaptureUri = data.getData();

             doCrop();

             break;
Line 10: After taking a picture, do the crop
Line 6: After selecting image from files, save the selected path
?
1
2
3
4
5
6
7
8
9
10
11
12
13
14
15
16
17
18
19
20
21
22
23
24
25
26
27
28
29
30
31
32
33
34
35
36
37
38
39
40
41
42
43
44
45
46
47
48
49
50
51
52
53
54
55
56
57
58
59
60
61
62
63
64
65
66
67
68
69
70
71
private void doCrop() {
        final ArrayList<CropOption> cropOptions = new ArrayList<CropOption>();

        Intent intent = new Intent("com.android.camera.action.CROP");
        intent.setType("image/*");

        List<ResolveInfo> list = getPackageManager().queryIntentActivities( intent, 0 );

        int size = list.size();

        if (size == 0) {
            Toast.makeText(this, "Can not find image crop app", Toast.LENGTH_SHORT).show();

            return;
        } else {
            intent.setData(mImageCaptureUri);

            intent.putExtra("outputX", 200);
            intent.putExtra("outputY", 200);
            intent.putExtra("aspectX", 1);
            intent.putExtra("aspectY", 1);
            intent.putExtra("scale", true);
            intent.putExtra("return-data", true);

            if (size == 1) {
                Intent i        = new Intent(intent);
                ResolveInfo res = list.get(0);

                i.setComponent( new ComponentName(res.activityInfo.packageName, res.activityInfo.name));

                startActivityForResult(i, CROP_FROM_CAMERA);
            } else {
                for (ResolveInfo res : list) {
                    final CropOption co = new CropOption();

                    co.title    = getPackageManager().getApplicationLabel(res.activityInfo.applicationInfo);
                    co.icon     = getPackageManager().getApplicationIcon(res.activityInfo.applicationInfo);
                    co.appIntent= new Intent(intent);

                    co.appIntent.setComponent( new ComponentName(res.activityInfo.packageName, res.activityInfo.name));

                    cropOptions.add(co);
                }

                CropOptionAdapter adapter = new CropOptionAdapter(getApplicationContext(), cropOptions);

                AlertDialog.Builder builder = new AlertDialog.Builder(this);
                builder.setTitle("Choose Crop App");
                builder.setAdapter( adapter, new DialogInterface.OnClickListener() {
                    public void onClick( DialogInterface dialog, int item ) {
                        startActivityForResult( cropOptions.get(item).appIntent, CROP_FROM_CAMERA);
                    }
                });

                builder.setOnCancelListener( new DialogInterface.OnCancelListener() {
                    @Override
                    public void onCancel( DialogInterface dialog ) {

                        if (mImageCaptureUri != null ) {
                            getContentResolver().delete(mImageCaptureUri, null, null );
                            mImageCaptureUri = null;
                        }
                    }
                } );

                AlertDialog alert = builder.create();

                alert.show();
            }
        }
    }
Line 4: Open image crop app by starting an intent ‘com.android.camera.action.CROP‘.
Line 7: Check if there is image cropper app installed.
Line 11: If there is no image cropper app, display warning message
Line 16-23: Specify the image path, crop dimension and scale
Line 25: There is posibility when more than one image cropper app exist, so we have to check for it first. If there is only one app, open then app.
Line 33-68. If there are several app exist, create a custom chooser to let user selects the app.

?
1
2
3
4
5
6
7
8
9
10
11
12
13
14
15
16
17
18
19
20
@Override
    protected void onActivityResult(int requestCode, int resultCode, Intent data) {
        if (resultCode != RESULT_OK) return;

        switch (requestCode) {

            case CROP_FROM_CAMERA:
                Bundle extras = data.getExtras();

                if (extras != null) {
                    Bitmap photo = extras.getParcelable("data");

                    mImageView.setImageBitmap(photo);
                }

                File f = new File(mImageCaptureUri.getPath());

                if (f.exists()) f.delete();

                break;
Line 11: After cropping the image, get the bitmap of the cropped image and display it on imageview.
Line 16: Delete the temporary image